
Category Archives: Other Info
greddy fmic install – manual
Greddy FMIC
install Manual
Scanned by
Jonathan Williams
Click Here(858kb):
Greddy3row.pdf
You will need:
![]()
![]()
greddy fmic install – manual
Greddy FMIC
install Manual
Scanned by
Jonathan Williams
Click Here(858kb):
Greddy3row.pdf
You will need:
![]()
![]()
drag racing basics
Drag
Racing Basics
Drag racing is a rush. It gives you the
feeling of adrenaline, a quench for speed and the taste – smell – and roar of mega
horsepower. There is nothing like it. It looks pretty easy right?……right!
Any monkey can go out and floor it, but he won’t be consistent nor
competitive. Drag racing requires lots of concentration and equal amounts of
practice. It is also one of the few places you can go out and give-er-all-u-got
without ending up in jail, especially with the levels of performance Supras can achieve.
Racing ain’t cheap though. The problem is the bug…the faster you go…the
faster you’ll want to go. Speed costs money. Although, you can achieve certain
levels of performance for low bucks – like me, there is a limit where it is going to
take some serious cash to go faster. I tend to always end up just below this level
with my cars. After all, these cars are my daily drivers too.Drag Racing Basics:
(Time trials not bracket racing)1. Pay your entry fee, sign the liability
waiver and pull around into the TECH line. Here they will check out your car to make
sure you have a PARK starter override (if you have an auto), no loose trim, tight lug nuts
and no wheel caps….this is usually the only thing you have to do; remove these prior to
tech.2. Once passing tech’s visual check, you need
to pass the safety check:(these vary and I may have missed some)
14’s or slower….no safety equip reqd.
12’s to 13.99……need a helmet SNELL certified.
10’s to 11.99……roll bar, helmet, drive shaft loop.
Faster than this…all the above plus fire system/suit and clean extra pair of
underwear.3. Now that you’re
official, have a number on your windows and a grin on your face..get in the staging
line(s). Here you will wait
and pull forward, slowly making your way to the starting line. Some people push
their cars forward, others drive. I’ve done both and noticed no difference with my
car’s performance.4. You are next! The
official will wave you and your competitor forward into the staging/burnout area. Wait
until the guys before you take off and then the starter will wave you forward. With
2-wheel drive and street/treaded tires, pull around the burnout box and back in.
This keeps all the water off the track and in the box. So, back you car’s rear
tires into the burn out box and heat-em-up! Be sure to spin all the water off of
them after the box so you don’t sit and spin at the line.5. Now your heart is
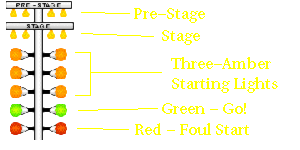
going, palms are sweating and you are ready! You need to know how the lights work
to understand the next stage. There are two yellow lights on the top of the
tree. When the first light comes on it means your front tires have passed the pre-stage
line. You need to pull forward -slowly- another couple of inches until the
second light down comes on also. At this point – you are staged. Don’t pull forward
or roll backwards…or you’ll look like a dork. Once your competitor has completed his
staging too, the race is soon to begin. The starter will normally start the
lights about 5 sec after the last person stages…so be ready. Have your RPM’S
up and ready to shift..autos too.
6. Here we go…this is the
rush part…the lights will start to flash downwards. Most street car classes
use the Sportsman’s tree. Three amber lights will flash at .5 seconds apart
and then the green will flash. I leave right on the last yellow….it takes my
foot that long to let go of the brake and mash the pedal. This give me reaction
times(r/t) of around .6 – .7 , a .5 is a perfect r/t.7. And they’re off! Watch
your RPM’s and shift around 200RPM past your peak power point. This keeps
the revs just under optimum for more power in
the next gear…..don’t forget to shift( I did this once real
early!) You will probably only use 1-3 in
both the auto and stick Supras. Keep it hammered until you cross past the
finish line. Now slow down and brake to make the first turnout (watch for your
competition…he doesn’t have those massive brakes you do) If you don’t make the
first turnout, there will be another 1/4 mile down the track. If you miss this one,
you’ll end up in Kansas.8. Now slowly pull around on the
return track and stop to get your timeslip along the way. Get back in line and beat
that time!What a
blast!
Removal of the Trac Pump & Trac Actuator
Removal of the
Trac Pump & Trac Actuator on 93-96 TT
Parts Needed:
– Toyota Brake line #47321-14280 (~$15-20).
this lines comes from the NA supra.
– 2x 10K ohm Resistors, 1/2 watt (radio shack, ~$1)
– One very short screw (cut it) &Teflon tape, 10mm x 1.0 pitch (Ace hardware,
~$1-2)
its center.
– Two rubber caps, 5/16″ & 3/8″, 2
clamps.
Time:
~3 hours
Tools needed:
Pliers, 10, 12, 14mm Socket &
wrenches,
flat tip screwdriver, and rubber hose with hose clamp.
was done clean up the look under the hood and make space where other parts
are just taking up space and not used anymore, like the trac pump…Also
makes it easy to reach the oil filter from the top..we also installed on EGR
block off plates, balance injectors, coated intake manifold..
***Here is how to do the trac pump removal mod in short,(93-96tt only!)
1) pick up needed parts as listed in this link
http://www.mkiv.com/techarticles/no_trac/
2) unbolt the trac pump and trac actuator, I was able to remove all the
parts without removing the brake master….plug the two ports on the brake
master with rubber caps & clips. install 2 resistors as shown in link above
in the harness…flush any brake line fluid with water right away if it
comes in contact with the paint!
3) you will have 2 lines left hanging across the firewall, a thick & a thin
line, chop up the thick line tell you get to the abs side, plug the end of
the thick line with a short screw and Teflon…
4) next chop up the thin line(remember its route carefully before you remove
it), get the new brake line and route it in place of the thin removed line,
this is not a walk in the park(hardest part), you will need to bend the new
line that goes on the driver side to route it behind the other brake lines(a
must), start routing from the passenger side to the driver side along the
firewall, the line should end up on the driver side into the brake
master(don’t screw it in yet), now pull the line a littlie further to the
driver side tell you can get it hooked to the abs on the other side, bend
back the line to its factory shape, tighten both ends…
5) bleed all brakes and check for leaks after test driving the car…
if you motor is out then all this will take you an hour to do…..if you
have a single turbo and no egr it would be easiest, hardest if you got stock
twins and egr in the way(like me)……


![]()
drag racing basics
Drag
Racing Basics
Drag racing is a rush. It gives you the
feeling of adrenaline, a quench for speed and the taste – smell – and roar of mega
horsepower. There is nothing like it. It looks pretty easy right?……right!
Any monkey can go out and floor it, but he won’t be consistent nor
competitive. Drag racing requires lots of concentration and equal amounts of
practice. It is also one of the few places you can go out and give-er-all-u-got
without ending up in jail, especially with the levels of performance Supras can achieve.
Racing ain’t cheap though. The problem is the bug…the faster you go…the
faster you’ll want to go. Speed costs money. Although, you can achieve certain
levels of performance for low bucks – like me, there is a limit where it is going to
take some serious cash to go faster. I tend to always end up just below this level
with my cars. After all, these cars are my daily drivers too.Drag Racing Basics:
(Time trials not bracket racing)1. Pay your entry fee, sign the liability
waiver and pull around into the TECH line. Here they will check out your car to make
sure you have a PARK starter override (if you have an auto), no loose trim, tight lug nuts
and no wheel caps….this is usually the only thing you have to do; remove these prior to
tech.2. Once passing tech’s visual check, you need
to pass the safety check:(these vary and I may have missed some)
14’s or slower….no safety equip reqd.
12’s to 13.99……need a helmet SNELL certified.
10’s to 11.99……roll bar, helmet, drive shaft loop.
Faster than this…all the above plus fire system/suit and clean extra pair of
underwear.3. Now that you’re
official, have a number on your windows and a grin on your face..get in the staging
line(s). Here you will wait
and pull forward, slowly making your way to the starting line. Some people push
their cars forward, others drive. I’ve done both and noticed no difference with my
car’s performance.4. You are next! The
official will wave you and your competitor forward into the staging/burnout area. Wait
until the guys before you take off and then the starter will wave you forward. With
2-wheel drive and street/treaded tires, pull around the burnout box and back in.
This keeps all the water off the track and in the box. So, back you car’s rear
tires into the burn out box and heat-em-up! Be sure to spin all the water off of
them after the box so you don’t sit and spin at the line.5. Now your heart is
going, palms are sweating and you are ready! You need to know how the lights work
to understand the next stage. There are two yellow lights on the top of the
tree. When the first light comes on it means your front tires have passed the pre-stage
line. You need to pull forward -slowly- another couple of inches until the
second light down comes on also. At this point – you are staged. Don’t pull forward
or roll backwards…or you’ll look like a dork. Once your competitor has completed his
staging too, the race is soon to begin. The starter will normally start the
lights about 5 sec after the last person stages…so be ready. Have your RPM’S
up and ready to shift..autos too.
6. Here we go…this is the
rush part…the lights will start to flash downwards. Most street car classes
use the Sportsman’s tree. Three amber lights will flash at .5 seconds apart
and then the green will flash. I leave right on the last yellow….it takes my
foot that long to let go of the brake and mash the pedal. This give me reaction
times(r/t) of around .6 – .7 , a .5 is a perfect r/t.7. And they’re off! Watch
your RPM’s and shift around 200RPM past your peak power point. This keeps
the revs just under optimum for more power in
the next gear…..don’t forget to shift( I did this once real
early!) You will probably only use 1-3 in
both the auto and stick Supras. Keep it hammered until you cross past the
finish line. Now slow down and brake to make the first turnout (watch for your
competition…he doesn’t have those massive brakes you do) If you don’t make the
first turnout, there will be another 1/4 mile down the track. If you miss this one,
you’ll end up in Kansas.8. Now slowly pull around on the
return track and stop to get your timeslip along the way. Get back in line and beat
that time!What a
blast!
Removal of the Trac Pump & Trac Actuator
Removal of the
Trac Pump & Trac Actuator on 93-96 TT
Parts Needed:
– Toyota Brake line #47321-14280 (~$15-20).
this lines comes from the NA supra.
– 2x 10K ohm Resistors, 1/2 watt (radio shack, ~$1)
– One very short screw (cut it) &Teflon tape, 10mm x 1.0 pitch (Ace hardware,
~$1-2)
its center.
– Two rubber caps, 5/16″ & 3/8″, 2
clamps.
Time:
~3 hours
Tools needed:
Pliers, 10, 12, 14mm Socket &
wrenches,
flat tip screwdriver, and rubber hose with hose clamp.
was done clean up the look under the hood and make space where other parts
are just taking up space and not used anymore, like the trac pump…Also
makes it easy to reach the oil filter from the top..we also installed on EGR
block off plates, balance injectors, coated intake manifold..
***Here is how to do the trac pump removal mod in short,(93-96tt only!)
1) pick up needed parts as listed in this link
http://www.mkiv.com/techarticles/no_trac/
2) unbolt the trac pump and trac actuator, I was able to remove all the
parts without removing the brake master….plug the two ports on the brake
master with rubber caps & clips. install 2 resistors as shown in link above
in the harness…flush any brake line fluid with water right away if it
comes in contact with the paint!
3) you will have 2 lines left hanging across the firewall, a thick & a thin
line, chop up the thick line tell you get to the abs side, plug the end of
the thick line with a short screw and Teflon…
4) next chop up the thin line(remember its route carefully before you remove
it), get the new brake line and route it in place of the thin removed line,
this is not a walk in the park(hardest part), you will need to bend the new
line that goes on the driver side to route it behind the other brake lines(a
must), start routing from the passenger side to the driver side along the
firewall, the line should end up on the driver side into the brake
master(don’t screw it in yet), now pull the line a littlie further to the
driver side tell you can get it hooked to the abs on the other side, bend
back the line to its factory shape, tighten both ends…
5) bleed all brakes and check for leaks after test driving the car…
if you motor is out then all this will take you an hour to do…..if you
have a single turbo and no egr it would be easiest, hardest if you got stock
twins and egr in the way(like me)……
![]()
Obd-II engine diagnostic codes
OBD-II Diagnostic Codes
Toyota Supra 1996-1998
| P0100 | Mass Air Flow Circuit. |
| P0101 | Mass Air Flow Circuit Range/Performance. |
| P0105 | Manifold Absolute Pressure Circuit. |
| P0106 | MAP/BARO Circuit Range/Performance. |
| P0110 | Intake Air Temperature Circuit. |
| P0115 | Engine Coolant Temperature Circuit. |
| P0116 | Engine Coolant Temperature Range/Performance. |
| P0120 | Throttle Pedal Sensor Switch “A” Circuit. |
| P0121 | Throttle Pedal Sensor Switch “A” Circuit Range/Performance. |
| P0125 | Insufficient Coolant Temperature for Closed Loop Fuel Control. |
| P0130 | Heated Oxygen Sensor Circuit – Bank 1 Sensor 1. |
| P0133 | Heated Oxygen Sensor Circuit Slow Response Bank 1 Sensor 1. |
| P0135 | Heated Oxygen Sensor Circuit – Bank 1 Sensor 1. |
| P0136 | Heated Oxygen Sensor Circuit – Bank 1 Sensor 2. |
| P0141 | Heated Oxygen Sensor Circuit – Bank 1 Sensor 2. |
| P0150 | Heated Oxygen Sensor Circuit – Bank 2 Sensor 1. |
| P0153 | Heated Oxygen Sensor Circuit Slow Response Bank 2 Sensor 1. |
| P0155 | Heated Oxygen Sensor Circuit – Bank 2 Sensor 1. |
| P0156 | Heated Oxygen Sensor Circuit – Bank 2 Sensor 2. |
| P0161 | Heated Oxygen Sensor Circuit – Bank 2 Sensor 2. |
| P0170 | Fuel Trim malfunction. |
| P0171 | System too Lean. |
| P0172 | System too Rich. |
| P0201 | Injector Circuit – Cyl. 1. |
| P0202 | Injector Circuit – Cyl. 2. |
| P0203 | Injector Circuit – Cyl. 3. |
| P0204 | Injector Circuit – Cyl. 4. |
| P0205 | Injector Circuit – Cyl. 5. |
| P0206 | Injector Circuit – Cyl. 6. |
| P0300 | Random Misfire. |
| P0301 | Misfire Detected – Cyl. 1. |
| P0302 | Misfire Detected – Cyl. 2. |
| P0303 | Misfire Detected – Cyl. 3. |
| P0304 | Misfire Detected – Cyl. 4. |
| P0305 | Misfire Detected – Cyl. 5. |
| P0306 | Misfire Detected – Cyl. 6. |
| P0325 | Knock Sensor 1 Circuit. |
| P0330 | Knock Sensor 2 Circuit. |
| P0335 | Crankshaft Position Sensor “A” Circuit. |
| P0336 | Crankshaft Position Sensor “A” Circuit Range/Performance. |
| P0340 | CMP Sensor Circuit malfunction. |
| P0385 | Crankshaft Position Sensor “B” NE2 Circuit. |
| P0401 | EGR Flow Insufficient. |
| P0402 | EGR Flow Excessive. |
| P0420 | Catalyst System Efficiency below Threshold. |
| P0430 | Catalyst System Efficiency below Threshold Bank 2. |
| P0440 | EVAP Control System. |
| P0441 | EVAP Control System Improper Purge Flow. |
| P0446 | EVAP Control System Vent Control. |
| P0450 | EVAP Control System Pressure Sensor. |
| P0451 | EVAP Control System Pressure Sensor Range/Performance. |
| P0500 | Vehicle Speed Sensor. |
| P0505 | Idle Speed Control System. |
| P0510 | Close Throttle Position Switch. |
| P1100 | BARO Sensor Circuit. |
| P1120 | Accelerator Pedal Position Sensor Circuit. |
| P1121 | Accelerator Pedal Position Sensor Range/Performance Problem. |
| P1125 | Throttle Control Motor Circuit. |
| P1126 | Magnetic Clutch Circuit. |
| P1127 | ETCS Actuator Power Source Circuit. |
| P1128 | Throttle Control Motor Lock. |
| P1129 | Electric Throttle Control System. |
| P1130 | Air-Fuel Sensor Circuit Range/Performance. |
| P1133 | Air-Fuel Sensor Circuit Response. |
| P1135 | Air-Fuel Sensor Heater Circuit Response. |
| P1150 | A/F Sensor Circuit Range/Performance. |
| P1153 | A/F Sensor Circuit Response. |
| P1155 | A/F Sensor Heater Circuit. |
| P1200 | Fuel Pump Relay Circuit. |
| P1300 | Igniter Circuit – No. 1. |
| P1310 | Igniter Circuit – No. 2. |
| P1335 | No Crankshaft Position Sensor Signal – Engine Running. |
| P1349 | VVT System. |
| P1400 | Sub-Throttle Position Sensor. |
| P1401 | Sub-Throttle Position Sensor Range/Performance Problem. |
| P1405 | Turbo Pressure Sensor Circuit. |
| P1406 | Turbo Pressure Sensor Range/Performance Problem. |
| P1410 | EGR Valve Position Sensor Circuit. |
| P1411 | EGR Valve Position Sensor Circuit Range/Performance. |
| P1500 | Starter Signal Circuit. |
| P1510 | Boost Pressure Control Circuit. |
| P1511 | Boost Pressure Low. |
| P1512 | Boost Pressure High. |
| P1520 | Stop Lamp Switch Signal. |
| P1565 | Cruise Control Main Switch Circuit. |
| P1600 | ECM. |
| P1605 | Knock Control CPU. |
| P1630 | Traction Control System. |
| P1633 | ECM. |
| P1652 | INTAKE air control valve control circuit |
| P1656 | OCV Circuit. |
| P1658 | Wastegate Valve Control Circuit. |
| P1661 | Exhaust Gate Valve Control Circuit |
| P1662 | Exhaust Bypass Valve |
| P1780 | Park/Neutral Switch. |
| The Diagnostic Codes and Explanations are derived from Manufacturer supplied Technical Data. |
|
![]()
How to dyno a supra tt
How to Dyno a
Supra TTBefore dynoing, it is
advisable to let the car rest for at least 1 hour with ice on the engine and the
intercooler piping. Also reset the ecu,
pull the trac fuse, and use 100 octane fuel if
possible, try to dyno on a cool day. The rpm sensor for the dyno will need to
connect to a timing wire. if you do not connect this sensor, you will not be
able to get a torque reading. the closest wire is located on the driver’s side
of the engine compartment in a small, black box, click
here for a diagram. once the car is strapped in, spray the intercooler with
ice water/alcohol mixture throughout the entire run if possible. Leave the ice
on the engine and intercooler piping as well. if the shop has a fan, direct it
towards the intercooler. the reason we take these additional cooling steps is to
approximate “real world” conditions. the temperature of the
intercooler has great bearing on the horsepower the supra will produce. by
taking these extra steps we are simulating the cooling effects of high velocity,
cool air, flowing across the intercooler that would be present in normal driving
conditions. once the car is situated on the rollers properly, slowly run the
engine through the first 3 gears with out bringing the 2nd turbo online. in 4th
gear bring the car slowly to 2000 rpms and then hammer it to redline! in an
automatic you want to disable o/d, bring the car to 4000rpms in 3rd gear SLOWLY,
and floor it to redline.


Supra alignment tech
Supra
Alignment TechThis
is the long awaited alignment tech. A
word of warning is necessary, price however. To
do an alignment right takes patience and at least a day for the first one you
do. Don’t think that you are going to do this in a couple of
hours if you want to do it right. I’ve
done literally hundreds of race car and street car alignments, and the last
time I did a list member’s Supra, it still took me about 4-1/2 hours.
If you can’t commit the time, you are probably better off trusting a
shop to do this for you, but be forewarned, results can be questionable from a
shop unless you know their work well. Most
shops won’t take the time to do a perfect job…they couldn’t if they
wanted to charge reasonable rates. You
KNOW you have done it right when you are done.
Equipment
needed:Camber
Gauge – you can spend a lot or a little.
The Dunlop gauge is very heavy duty, but IMO expensive for what it
does…there are more accurate gauges for less.
Pegasus Racing has a decent selection, but they don’t carry the TML
gauge anymore…theirs ranges from $120 for the digital model (not a bad
price) with $80 for the camber attachment (not absolutely necessary) to $221
for the Dunlop gauge, with the Longacre going for $174.
TML’s camber gauge is generally less, you can contact them at PO Box
356, Hinsdale, IL 60521. Pegasus can be reached at 800-688-6946.
Toe
measurement:Toe gauge: you can
get a toe gauge, but the inexpensive ones can’t measure toe relative to the
centerline of the chassis. Best
thing is with the string method, and it’s cheaper.
You will need: Fishing line (preferably around 10-12 lb. test in a
highly visible color), get a 100 yard spool.6 concrete blocks
(the 8x8x18 inch ones) or something similar that can be used to run string
from one to the other under tension.Plumb bob with string.
Several sheets of
construction board paper that is the is as long as the width of the car
and at least 24 inches wide.Steel retractable tape
rule with metric gradations (I use one from Stanley)Steel ruler with metric
gradations.Chassis
manual for your car – there are camber/caster adjustment tables that are
needed…however, if they are scanned in the Mkiv.com site, you can just print
them out from there.Level
working area. The closer to
level, the better…if you’re garage floor is off by 0.25 degrees, this will
skew your camber measurements. If you’re not sure (and just throwing a level on the ground
won’t tell you this, you need to level the spots the tires are on), there is
a measuring device sold in hardware stores to do this…it’s two tubes with
gradations on them and a flexible plastic tube connecting them.
You fill them (and the flexible tube) with water until the water hits
the “0” mark on both of the tubes (the tubes have to be level for this to
happen). Now you just place the
tubes on the spots where your car’s tires will be parked and you can see
which spot is high and which are not. I
use linoleum tile or sheets of wood and metal to level out each spot.In
general, I feel that the best order in which to do an alignment is to take all
measurements first, then align the front, then align the rear.
The most time consuming will be the toe measurement, as you have to do
a baseline measurement which will be referenced against the centerline of the
car. This is basically for the
rear of the car, as the front typically doesn’t have a problem with this.
If the toe is not referenced to the centerline of the car, the car will
“crab” in a straight line and you will have to put in some amount of
steering lock, to the right or left, to keep the car going in a straight
line…both sets of tires will be pointed ahead in parallel paths, but they
won’t be in line with each other. You
could align the front tires to compensate but then they will be skewed in the
opposite direction from the centerline of the car and the unequal tie rod
lengths from one side to the other won’t be desirable in terms of bump steer
(no, I haven’t tested this, nor do I want to with the Supra, it’s a PITA
b/c you have to remove the springs to do it and hold the car up on ride height
blocks).Also,
it goes without saying to record down your various measurements as you go
along. It behooves you to measure
the changes also, as this will give you a rough idea of how much change
results from “x” amount of tie rod or suspension “turns.”
That way, you can make minor (very minor) changes at the track if need
be without having to go through all this.
Determine
the centerline of the car:So
that you can envision what we are trying to accomplish, look at this diagram
and then go through the directions.
There
are two methods to do this…one is the best way, but more of a PITA…it all
depends on how good a result you want. If
you do it the second way, it depends a great deal on how accurate your body
panels are on your car. If your
car’s ever been in an accident and panels replaced, unless you are sure of
the alignment of all panels, I wouldn’t even consider this method.
In fact, I wouldn’t consider this method, unless I was in an extreme
rush, but it’s there for those of you who want to consider it.
It’s for those who want to do it in less time than the best way to do
it.
–
First and best, but PITA method:1)
With the car on a level surface, place the sheets of paper between each
set of wheels…you should tape the paper down, or have them underneath the
tires and the levelling pads so they stay still and flat.
Make sure the steering wheel is straight ahead.2)
Underneath the car, use the plumb bob to determine a reference point at
an inboard suspension point at each wheel. This can be any point, but should not be at a movable pivot
point (such as the cam adjustment points of the suspension), and must be the
same corresponding point on the other side of the car. Mark this point on the paper with a pencil…be accurate,
take your time…an inaccuracy of 1mm is significant as we are dealing in ½
mm increments on some measurements.3)
Measure between the two points at each end, and mark a point halfway
between each set of wheels. This
is the centerline.Now
I’ve had one Mkiv.com member make a good observation that most low cars, and
especially a Supra that has been lowered, will be difficult to find the
centerline as there is not much room to get down there and hang a plumb bob.
So I have modifed the method so there are actually 2 of the correct
methods.1)
With the car on a level surface, place the sheets of paper between each
set of wheels…you should tape the paper down, or have them underneath the
tires and the levelling pads so they stay still and flat.
Make sure the steering wheel is straight ahead.2)
Jack up the car and take care to make sure that it is as even as
possible. You may have to use
sheets of linoleum on each jackstand to ensure that the car is evenly up in
the air. Off the top of my head
(without doing the geometries) I’d say that if the car is within a ½ inch
of being level you should be okay.3)
Underneath the car, use the plumb bob to determine a reference point at
an inboard suspension point at each wheel. This can be any point, but should not be at a movable pivot
point (such as the cam adjustment points of the suspension), and must be the
same corresponding point on the other side of the car. Mark this point on the paper with a pencil…be accurate,
take your time…an inaccuracy of 1mm is significant as we are dealing in ½
mm increments on some measurements.4)
Measure between the two points at each end, and mark a point halfway
between each set of wheels. This
is the centerline.5)
Using two of your anchors, extend a length of fishing line from one end
of the car to the other, directly over the centerline.
With the plumb bob, determine where the centerline is on the body of
the car on the nose and tail (preferably near the bottom of the nose and tail
– you’ll see why in a minute). Using
a grease pencil or similar instrument, carefullly mark these points on the
car.6)
Now when you lower the car and raise it for adjustments, then roll it
back and forth to get the stiction out of the suspension, you only have to lay
out the lines underneath the car again using the marks you just made to
establish the centerline within minutes.
–
Second method of finding the centerline:Simple
enough after you read the above section that I’ll basically outline the
procedure. You look for two
points at each end of the car, two front, two rear, that is the center of the
car. On the front you might open
the hood and measure between the two fenders and perhaps the two shock mounts.
Using a long ruler/yardstick, extend this centerline past the nose of
the car and using a plumb bob, drop the point down to the paper you have on
the ground. At the back you might
use the center of the wing or the center of the hatch glass.
Now all you have to do is to extend this centerline for a couple of
feet forward and rearward of the car.
Measuring toe in:
1)
Stretch a section of
fishing line for two feet beyond the front and rear of the car, underneath the
car at ground level and lined it up with the two marks you’ve made on the
paper. Make sure these are
taut…obviously you will have to anchor them betwwen 2 of the concrete
blocks. Now you’ve extended the
centerline of the car.2)
Stretch another section of fishing line on either side of the car
running the length of the car and 2 feet beyond each end of the car.
These two lines should be at about the height of the center of the
wheels and about 7.5 cm (3 inches) from them (any distance away from the
wheels would be okay but the further away you are the more errors can creep in
if you don’t keep your measuring ruler the same exact height and angle every
time…3 inches introduces very little error due to this).
Using the plumb bob and the metric tape measure to set these up
parallel to the centerline section you are using.
You will have to readjust the front and rear anchors several times to
get both right…patience is the key here, as well as throughout the
alignment.3)
Now the easy part…measuring the alignment.
Go to each wheel and measure the distance from the string to the front
part of the wheel (measurement “A”) and the rear part (measurement
“B”) of the wheel. Subtract
the front measurement (A) from the rear measurement(B)…if it’s negative,
the wheel is toe’d in. Positive
and it’s toe’d out (these are just my conventions, as long as you know if
it’s toe in or out, that’s fine). The
rear’s are critical…be sure they are equal left and right.
Measuring
Camber:1)
Take the camber gauge and put it agains the wheel, making sure it’s
vertical as you’re looking at it (it should not be inclined towards the
front or rear of the car). If
your wheels are scraped up from curbs, you can measure on the tire as long as
you take care not to allow any raised black lettering affect the angle of the
gauge, or any bubbles in the tire (if you have any damage).2)
Measure the camber according to the directions of the camber gauge.
Measuring Caster:
1)
Caster is measured either directly or indirectly.
Directly means you use a camber gauge and place it directly on the
steering knuckles and measure their rearward inclination.
Most people don’t do this as it is very difficult to get a gauge into
a wheel well and accurately measure this.
The indirect way is by measuring the camber with the wheel turned
“x” degrees to the right, then measuring again with “x” degrees to the
left, and subtracting the smaller of the two measurements from the larger one.Now
you take all your measurements together and decide where you need to go from
here. The first thing is to make
sure your rear wheels are equally toed on both sides…if not, you will need
to adjust this. Although it’s
not totally accurate, use the Toyota chart to determine how you need to to
adjust the rear wheels. NOTE –
you must be sure to observe the convention of how they reference their
alignment marks – you must turn the the adjustment cams from the “bolt
side” and it is from this side that they reference clockwise and
counterclockwise. The convention
that is used by Toyota is either clockwise or counterclockwise looking
straight at the head of the adjustment bolt.
For the front suspension, the you have to look at the front cam from
the rear of the car looking forwards, and for the rear cam you will be looking
at it from the front of the car looking back towards the rear of the car. At the rear suspension, you will be looking at the front cam
from the front of the car looking back at the rear of the car, and the rear
cams you will look at them from the rear of the car looking towards the front
of the car. Sounds a little
confusing, but once you’re underneath the car all will be much clearer.This
will be a basic starting point. Note
also that in my manual they have the conventions backwards (i.e., the
direction for increasing negative camber should have been clockwise at the
front cam and counterclockwise at the rear cam, not counterclockwise and
clockwise as is illustrated in the manual).
You will find out after you do your first adjustment.
Anyway, you can adjust toe and camber simultaneously, and will probably
have to as both will most likely need to be adjusted.
For this you will need to jack up the car and loosen the nuts on the
adjustment cam bolts. Be
forewarned, if your car hasn’t been aligned before, they will most likely be
very tight, and a breaker bar is recommended.
A helping hand would be useful too, not only to help loosen them, but
to hold the adjustment cams in place while you tighten down the nut after you
adjust the cams. The basic
procedure is this:1)
Decide how much you need to adjust the cams.2)
Loosen the nuts on the cam adjustment bolts.
TIP – leave some “torque” on the nuts so that the cam adjustment
bolt doesn’t just change adjustment from the weight of the car.3)
Turn the bolt until the cam has moved the appropriate number of marks.4)
Hold the bolt while you tighten the nut.
You don’t have to go monster tight at this point (i.e., torqued to
Toyota specs) as you will most likely need to fine tune this.5)
Lower the car and measure the changes.6)
Assess whether or not the changes are in the direction you want (if
they’re in the opposite direction, then you know the Toyota manual is
backwards on the conventions).Ater
you adjust them, you need to roll the car back and forth several times to
“settle” the suspension. Now is the PITA part…you have to re-establish the
centerline of the car again to measure rear toe.You will have to
repeat until you get the results you want.
Go back and forth with the toe and the camber measurement until they
are both where you want. If it
seems you have to compromise somewhere, compromise with the camber and not
with the toe (i.e., get the toe exact, but the camber can be up to ¼ degree
off and not be significant for our intents and purposes – this does not
apply, however, if you’re roadracing).The
front toe is easier (by far). Basic procedure is to adjust the toe first, then camber, then
recheck the toe. To check the
toe, I go with total toe (it is not necessary to reference them to the
centerline, as long as the 2 toe links are close to each other in length, the
manual says no more than 1 mm difference).
To measure the toe:1)
Take your tape measure and with a helper, go the front of the tires and
measure from the outermost tire groove on one tire to the same groove on the
other tire. This is measurement
A. You will have to measure below
any body work or chassis…although this is not the center of the tire, it is
close enough. If this isn’t
accurate enough for you, you can use the centerline method to establish
measurement lines again as you did for the rear tires and measure to the wheel
or outer wall of the tires.2)
Repeat for the rear of the front tires.
This is measurment B.3)
Subtract A from B, this will be your total toe in or toe out.
If the number is positive, it is toe’d in, if negative, it is toe’d
out. 0 measurment is 0 toe in.4)
Check the length of the tie rods…they should be within 1 mm of each
other, if not adjust them so that they are. You need to loosen the jam nut on them and the boot clip
before you do so. Take note of
how many turns you use on the tie rod to achieve this.
Normally you will not need to do this.5)
Adjust the toe by turning the tie rods equally on both sides.
Take a note of how much you turn the tie rods (and be as precise as
possible…I get down to 1/8 of a turn on my measurements, even 1/16
sometimes). You will have to
observe the thread direction on the rods to know which way to turn them to
either draw the front of the tires closer together or spread them further
apart (I’m making the assumption that everyone is a reasonably adept at
mechanics so that they can determine this…if not, email me and I’ll tell
you how to do this).6)
After the adjustment, roll the car back and forth and take a new
measurment. Correlate the change
in toe to the amount you turned the tie rods.
Use this for your next round of adjustments. For instance, if the toe-in was 4 mm, and you want 0 mm…you
turn the tie rods out ¼ turn…and the new measurement is 4 mm
out…therefore, ¼ turn on both tie rods equals about 8 mm change in toe. You need to go back 4 mm (to get to 0) so you need to turn
the tie rods 1/8 turn IN.7)
Make the appropriate change and measure the car again.Now
you want to adjust the camber. Similar to the rear, there are front and rear adjusting cams
on the car. Again, use the manual
to determine the changes you need, both for camber and caster.
Loosen the adjusting cam nuts, then turn the bolts to the desired
change and tighten down the nuts. Take
the measurment and see how close you are to the desired measurment.
This will be similar to the other adjustments where you make gross
adjustments, then fine adjustments until you reach the desired adjustment.
Once done, you will have to measure the toe again, which will most
likely have changed. Readjust the
toe then take the camber and caster measurements again, adjust if necessary.
This can go back and forth a few times and thus take a lot of time.When
done make sure you torque down the eccentric cam adjuster bolts to spec.
If you don’t you run a real risk of your carefully hand done
alignment gradually moving out of alignment!After
this, you are done…probably at least 6 hours later.
Questions? Comments?
Me
